
Firebase Applications – The Untold Attack Surface
Introduction
In this blogpost, we will review some of the basic components of a Firebase application from a Security Perspective and talk about common issues that don’t get enough attention.
What is Firebase?
Firebase is a complete backend as a service with many different features that we can plug straight into our applications. For example:
- Firestore – This is a NoSQL database, allowing you to store your application’s data
- Firebase Auth– A service that allows you to add authentication & authorization into your firebase applications by configuring the Firebase Security Rules
- Cloud Functions– Serverless service. Allows you to run a backend code (usually this is where you’d place your REST API backend)
- Cloud storage – for storing files
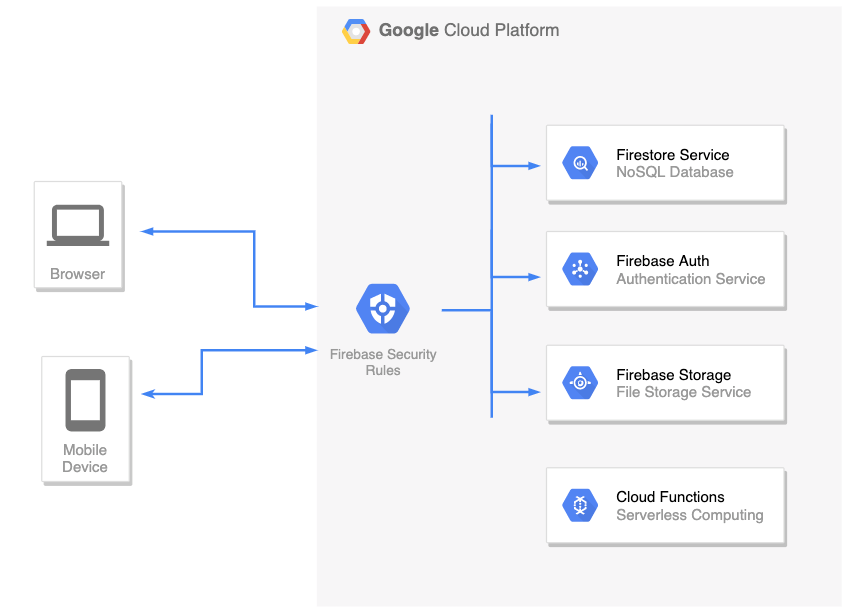
There are more services such as Cloud Messaging, Analytics, Machine Learning, etc.
The list of features is really big and won’t be covered here. In this post, we’ll focus on the first two: Firestore DB and Firebase Auth.
Firebase Auth
Firebase Authentication is used to authenticate users to your app. It provides easy-to-use SDKs, and ready-made UI libraries. It also supports authentication using passwords, phone numbers and identity providers such as Google, Facebook and Twitter, and more.
Security Fun Fact: As long as the Firebase Auth service is enabled: registration is always open, meaning that it’s possible to create new users even if the application itself doesn’t have a registration page (for example: Internal Organization Applications where the accounts created by the company’s employees and not remote clients)
You can create a new account in your target application by utilizing the Client SDK and call createUserWithEmailAndPassword() directly with your own JavaScript code:
<script src="https://www.gstatic.com/firebasejs/7.15.5/firebase-app.js"></script>
<script src="https://www.gstatic.com/firebasejs/7.15.5/firebase-auth.js"></script>

<script>
    /*
    * Insert your target's application config in the firebaseConfig object below.
    * This information exists in the client-side and visible to everyone.
    */
const firebaseConfig = {
    apiKey: 'redacted',
    authDomain: 'redacted',
    databaseURL: 'redacted',
    projectId: 'redacted'
};

app = firebase.initializeApp(firebaseConfig);
authService = firebase.auth();
authService.createUserWithEmailAndPassword('appsec@pwn.com', '123456789').then( creds => {
    console.log(`Account created (${creds.user.email})`);
});
</script>
The snippet above will create a new account. This allows a remote attacker to test not only Authentication issues, but also Authorization issues, for example: Since the attacker now has a new account in the application, he can obtain a JWT using signInWithEmailAndPassword() and start performing queries in the Firestore DB that are not available to un-authenticated clients.
How to prevent
As it is right now (2020), you cannot disable sign-up without disabling the whole Auth service (meaning, disabling sign-in for all users too).
However, there’s a workaround for this: If you want to close the registration option but keep the Auth service alive (so other users will still be able to login), you can implement a custom Cloud Function that hooks into the user creation process using the Authentication Service Triggers.
Firestore DB
Firestore itself is a NoSQL database. Meaning that we don’t use columns, table and rows.
Instead, when we create a Firestore database, we split our data up into collections.
And inside each of those collections we store documents (which you can think of “records”).
For example: We have this collection called “books” and all those different documents stored inside it. Each one of those documents are given a unique identifier (usually generated by google)

Web Application / Mobile Applications’ front-end code uses Firestore client SDK to communicate directly with the Firestore DB in real-time and perform actions such as Update, Delete, Get, Create, and more.
We don’t want malicious users to perform queries on other legitimate user’s data in the Firestore DB. In order to enforce authentication and authorization between clients, every incoming request is filtered using the Firebase Security Rules, which we’ll review next.
Firebase Security Rules
Firebase Security Rules is an additional layer of access control and data validation which allows you to filter requests/Firestore DB queries before they are processed further in Google’s Cloud Environment. In order to create a user-based and role-based access system that keeps your users’ data safe, you should use the Firebase Auth service (which we reviewed before) with proper Firebase Security Rules set.
To identify the client that sends a request/query, Firebase Security Rules provides us a special object called request.auth:
- If the client is not authenticated, this object will be null
- If the client is authenticated / has a live session: This object contains the properties from the user’s JWT.
Note: Google’s server-side is responsible for validating the signature of the client’s JWT. Hence, when writing the security rules, we can assume that the data in request.auth object is coming from a trusted source.
“How do I write Rules to enforce Authentication?”
To enforce authentication, you just need to make sure that the request.auth object is not null when writing the Security Rules.
For example:
service cloud.firestore {
  match /databases/{database}/documents {
    match /usersBooks/{userId} {
      allow read, write: if request.auth != null;
    }
  }
}
“How do I write Rules to enforce Authorization?”
The snippet below shows how to use the request.auth object in order to identify who’s sending the request, and more importantly, to determine whether this client is authorized or not to perform a query:
service cloud.firestore {
  match /databases/{database}/documents {
    // Make sure the uid of the requesting user matches name of the usersBooks
    // document. The wildcard expression {userId} makes the userId variable
    // available in rules.
    match /usersBooks/{userId} {
      allow read, write: if request.auth != null && request.auth.uid == userId;
    }
  }
}
Pentesting Firebase Apps
The most popular attack vector for Firebase Applications is checking if the Firestore DB can be accessed without authentication. There are a lot of tools/automated scripts on github that is doing this security check.
However, this security check is very simple and it covers just the tip of the iceberg. Besides authentication issues (which can be mitigated by adding a simple if request.auth != null rule), there’s a whole world of Authorization issues that was left undocumented.
Since this subject didn’t get enough attention, I decided to write firepwn: A tool for testing Firebase Authentication and Authorization issues.
The tool can be found here: https://github.com/0xbigshaq/firepwn-tool
Firepwn uses Google’s Client SDK to perform any query of your choice (get, set, delete and update), example:
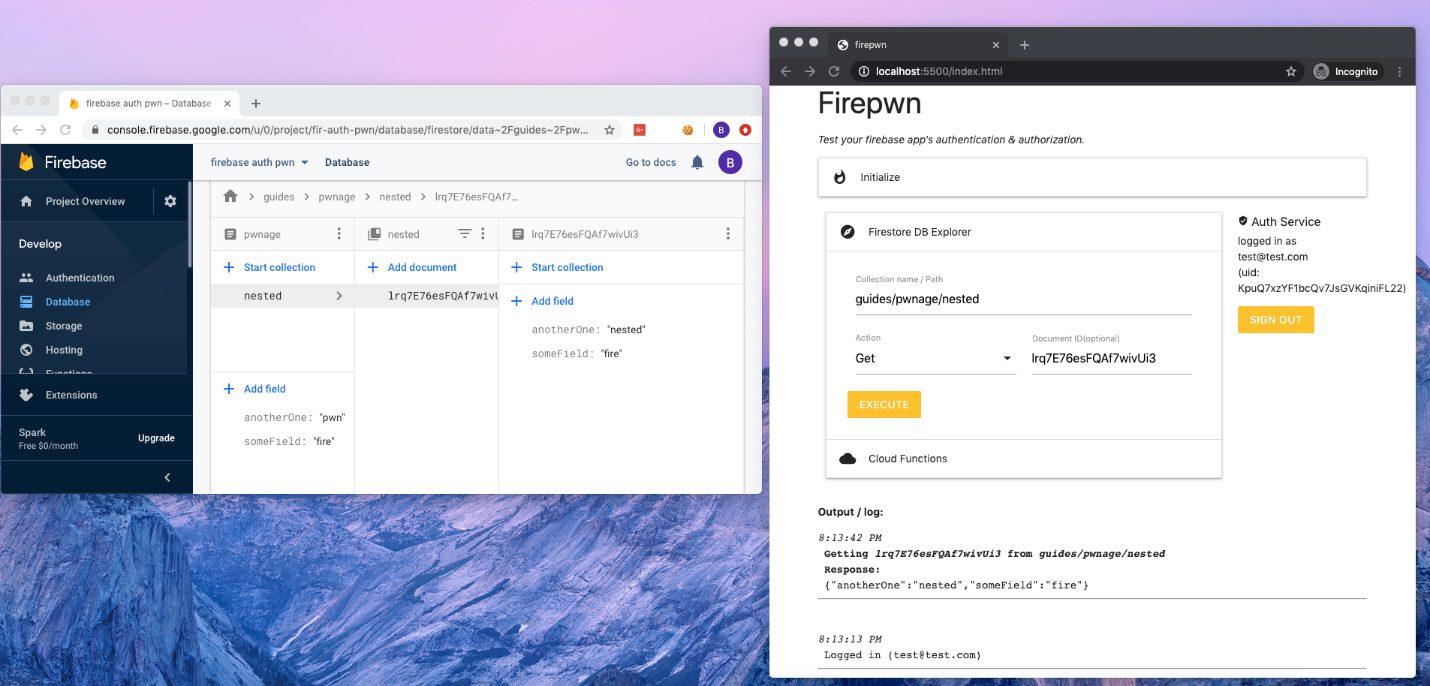
This will allow you to “extend” the abilities of your target application and perform custom queries of your own.
Testing for Authorization Issues
If you want to check for Authorization issues, make sure you are authenticated to the target application. This can be done using the Auth Service (on the top right of the UI):
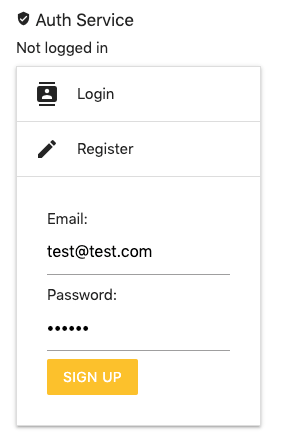
If you don’t have an account in your target application, you can register a new one by using the “Register” feature (above) and then login with those credentials to obtain a fresh JWT.
Testing Authentication Issues
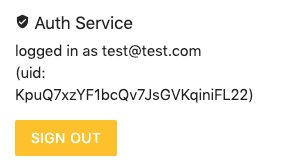
To perform authentication checks: Simply perform queries and make sure that the “Auth Service” (on the right) says “not logged in”.
A Taxonomy on Brute Force Attacks
Brute force attack is a well-known technique of trial and error attempts used by attackers to gain access to unauthorized data. It can be leveraged against servers as an online attack and also against files as a local attack.
The common denominator of all these types is that the same pattern is almost always the same:
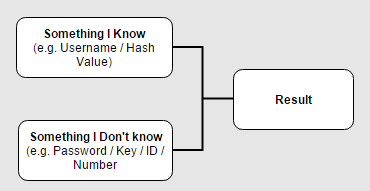
In most cases the attacker would have to know two major keys from the diagram – let’s take for example a common scenario where the attacker tries a brute-force attack on the login interface of an applicaiton in order to find the correct credentials of a certain account. The known keys would be:
- Something I know – In this case, the username of the account that the attacker wants to hijack.
- The result – On each attempt, the attacker receives an indicator of failed/successful result.
The well-known brute-force methods are:

Hacking Android Apps Through Exposed Components
In almost every Android application, developers expose activities without sufficient protections. Exposing activities can lead to various attacks. For example, an attacker or a malicious app installed on the same device, can call those exposed activities to invoke internal pages of the application. Calling internal pages puts the application at risk of phishing by manipulating […]

Embedded Ajax Brute-Force Tool
There are a few cases when preparing a PoC for brute-force attack on the login page can be complicated. It is no longer uncommon to find a login form based on web sockets, or which implements some sort of client-side encryption with JavaScript. In these cases, configuring a brute-attack quickly with a middle proxy (e.g. Burp’s Intruder) is not possible. It also happens that clients request for the penetration testings to be conducted on a specific machine, without access to common attacking tools.
For these reasons, I wrote a very minimalistic brute-force tool that runs inside the browser (the source code, following this post, has to be copy-pasted into browser’s JavaScript console).

Android Emulator Tricks
When performing security (or regular) tests on Android applications, we sometimes need to emulate or fake mobile data or actions; making/receiving calls, sending SMS or setting the exact geo-location are some commands that can be done, using the Emulator Console. Here are a few tricks that will help you through Android application testing using the emulator:
· First, connect to the emu, using telnet:
telnet localhost 5554
· To change geo-locations:
geo fix <longtitude value> <latitude value>
· To make a phone call to the emulator:
gsm call <callerPhoneNumber>
· To send an sms to the emulator:
sms send <senderePhoneNumber> <textMessage>
· To scale the emulator window:
window scale <value from 0 to 1>
· To take a screenshot:
screencap -p </path/to/filename.png>
· To create input events (event codes list):
input keyevent <event_code>
Monkey
The Monkey is a command-line tool that runs on the emulator instance or on a device. When the Monkey runs, it generates pseudo-random events and sends them to the system.

IOT – Compiling Brillo Easily
Google published the first version of Brillo, and as IoT researchers, the first thing that we want to do is to quickly compile and run it in order to get a feel for it, investigate it and learn as much as possible about the system…
At the beginning of our work we made some assumptions, which we found to have been correct:
- Instead of installing a new environment, it will be easier to install it on our AppUse VM which already has a lot of stuff on it.
- Google probably built it similarly to Android (both are Unix-based), so we took the Android compilation guide (links below).
Despite these shortcuts, we still came across a lot of trouble… I know for sure that you don’t want to waste your time to find and fix some stupid errors, so let me give you the shortest way to install it in a few steps and one script 🙂
Read more →

How to connect a real device to AppUse
![]()
In order to connect a real device you should do the following steps:
- Enable USB debugging mode:
a. Open your device’s “Settings.”
This can be done by pressing the Menu button while on your home screen and tapping “System Settings.”
b. Scroll to the bottom and tap “About phone.”
c. On the “About” screen, scroll to the bottom and tap on “Build number” seven times.
If you see the message “Not needed, you are already a developer!” pop up, then you know if the command succeeded.
Read more →
SSL Vulnerabilities Analyzer 1.1 published
Hi people
After a few months of work and research we have updated the SSL Analyzer tool to version 1.1. So, here is a description about the SSL Analyzer and who should use it.
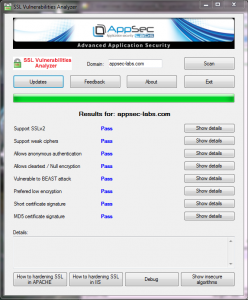
What is it?
This tool was created for penetration testers and for site administrations who want to check if their server allows usage of insecure SSL algorithms.
SSL did not allow attackers to read/change the traffic between the client (computer/mobile browser) and the server, if the server allows insecure algorithms, the attacker can force the browser to use them and break the encryption (as they are named, they are insecure algorithms…).
Easy to use
SSL Vulnerabilities Analyzer has a nice interactive tool that makes it easy to run and check if the server contains insecure algorithms also for non-technical people.
Source code
SSL vulnerabilities analyzer shared with his source code under GPL v3 license, as a gift back to the open source community.
Download
You can download the current version (1.1) from here: SSL Analyzer version 1.1 zip
For more details, source code and versions, please visit the dedicated area in our website: https://appsec-labs.com/SSL_Analyzer

Advanced iPhone Hacking with iNalyzer
The slides from my OWASP Israel 2012 talk “Advanced iPhone Hacking with iNalyzer” have been uploaded and are available here.
iNalyzer iPhone testing tool that was presented in the talk can be downloaded directly from Here (You will need Graphviz Dot and Doxygen installed on your PC/Laptop )
Here is an Installation Video (currently no Sound..)
iNalyzer Installation and usage
Here is a small demo of iNalyzer Vs. iSafePlay
iNalyzer Vs. iSafePlay
Enjoy,
Chilik